Unified Setup Guide (Docker)
Table of contents
Introduction
Docker is a container framework, allowing the running of tiny versions of operating systems and tools in an isolated environment on your machine. Docker produces containers from images, which are exact “recipes” for building a container, allowing (more or less) the exact same environment, or container, to be produced on any computer. Docker is widely used in industry — you might imagine that being able to easily produce the exact same environment for an application on any computer would be a desirable trait. We can use that similarity in environment to give you a development environment extremely close to what’s on the CAEN or Autograder, which helps alleviate certain development issues that may appear.
When you run an image in Docker, it first uses that “recipe” to get some background information about what operating system it should be running in (the “base” image; this doesn’t necessarily have to be an operating system, but it often is). It then starts up a container, which is similar to a virtual machine, but much smaller (it shares the “kernel,” or basic operating system functions, with the host to decrease resource usage like CPU, memory, and disk space), to safely isolate the code in the container from your computer, and begins carrying out the instructions of the image to produce the final container. The result is what seems like a smaller computer running within your own, possibly on a completely different operating system, but without many of the annoyances of virtual machines. (On macOS and some Windows hosts, a virtual machine actually is being run, but this is done transparently by Docker and requires no management from the user.)
This system allows us to include the tools you’ll need for projects in an image, after which a container will be built on your machine with the exact same versions of all the tools that we expect you to be using, with no setup on your part! Even better, Visual Studio Code integrates extremely well with Docker, meaning that VS Code can be run within this Docker container, sharing all of your project files with where they exist on your computer, and allowing you to hardly notice that you’re coding in a container at all. This even works for host machines running an Arm processor—for students with an M1 Mac, the process will work exactly the same for you, including the same tools!
Step 1: Installing Docker
The first step in using Docker is installing it. Navigate to the Docker Desktop download page, and download the file corresponding to your current machine (the “host” machine)’s operating system.
For macOS users, it is a typical .dmg installer, and for Windows users, an .exe installer is included that performs the installation process.
Windows users may find the Windows Linux Subsystem Guide helpful in this step, as a WSL installation is highly recommended for running Docker on Windows. Docker installer may guide you with this (or do it for you) as well.
For Linux users, Docker provides packages for multiple distributions; more information is included in their guides. (We do assume some Linux knowledge for students who choose to maintain a Linux host in this guide, but if you’re having any difficulties, feel free to reach out to us.)
After installing Docker Desktop (macOS and Windows), open the installed application and allow few more minutes for it to bootstrap. You are ready to go once the status bar in the bottom left corner of the Docker Desktop window turns green. For linux users, docker should be ready to use immediately after installation.
Step 2: Setup VS Code for Using Container
If you haven’t installed VS Code yet, please download it from their website and follow their instructions to install it before proceed forward.
After installing Docker and VS Code, click here to install the “Remote - Containers” extension in the VS Code marketplace:

If the link above doesn’t work, you can also install the extension manually by searching it in the extension tab on the left panel of VS Code.
After installing the extension, open the Command Pallette (CTRL+SHIFT+P on Windows/Linux; ⌘+⇧+P on macOS), type code path to configure code command for your terminal: 
Then open the Command Pallette again, type devcontainer cli to configure the devcontainer command: 
Select create/add and ok if prompted.
You are now all set to use VS Code with Docker 🎉. Step 1 and 2 are one-time setup steps, you only need to go through them once.
Step 3: Create Project Workspace
A Visual Studio Code “workspace” is the collection of one or more folders that are opened in a VS Code window (instance). In most cases, you will have a single folder opened as the workspace. This is the folder that contains your project files, and is the folder that will be used as the root of your project.
Optionally, see workspace documentation if you want to learn more about workspace.
We have provided a script to help you create a workspace for your project. To use it, open in terminal the directory where you want to create the new project folder at, and run the following command:
bash -c "$(curl -fsSL https://raw.githubusercontent.com/CAENTainer/EECS281-Devcontainer/main/new_project.sh)"
The Setup Wizard will then ask for project info and create the necessary configurations for you.
For windows user, you need to run this command in WSL bash rather than PowerShell or cmd.
You’ll need to do this for every individual project. Please do NOT reuse the same workspace for multiple projects.
Step 4: Open your Workspace
You should now have a new folder created in the directory you specified. Open the entire folder with VS Code (don’t just open a single source file), you should receive a pop-up message to open the current workspace in a container; if not, open the Command Pallette (search on this page for how to open it if you forgot), then type reopen in container and select the command: 
Your VS Code window will close and reopen. It may take a few minutes to build the container; its status can be followed in the bottom right of the window. After this finishes, you’ll be greeted with a relatively normal-looking VS Code window, with an exception - looking at the bottom left of the window, you should notice that your environment has changed to “Dev Container”: 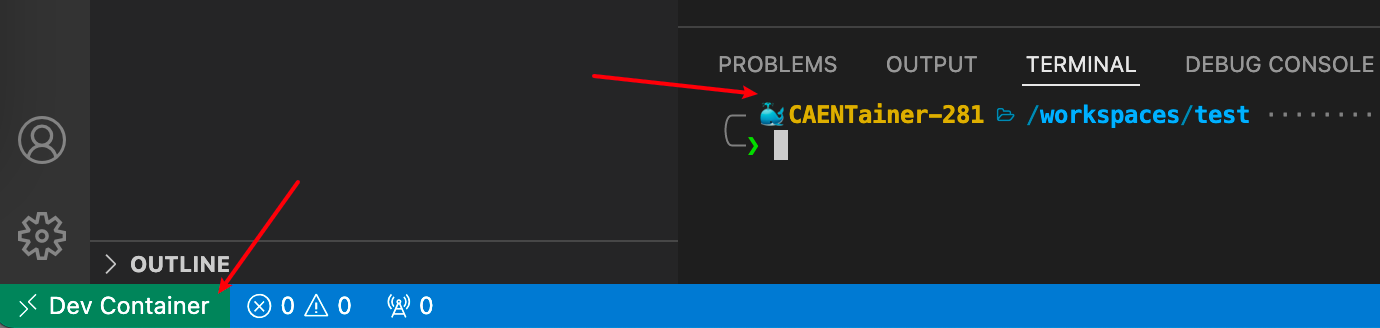
Congrats 🎉 — that was it; you’re now working within the container!
Any edits you make to the directory within the container will be reflected on your host machine, vise versa. Besides, you can now run advance debugging tools, such as gdb, valgrind and perf directly from your container through the terminal in VS Code, as what you can do on CAEN. This is really so cool!
In addition to editing files and using a terminal in the container, VS Code also supports debugging code in the container out of the box. We have set up the launch.json files for projects where debugging using an IDE makes sense; you might need to fill in a few values (like your program’s command line arguments) to get started though - don’t be scared, we’ve provided a handy template in that file for you to use.
For future projects, you’ll simply need to perform the step 3~4 again.
Appendix A: tools available in the container
Following tools are pre-installed in container for your convenience:
vscarg- a wrapper of vscode’slaunch.jsonto make command line arguments easier to setvalgrind- a tool for memory debuggingperf- a tool for performance analysisgdb
You may run those tools directly from the terminal in VS Code. They will NOT be available in your host machine (outside the container).
Appendix B: Details of VS Code Configurations
A typical EECS 281 VS Code project folder (workspace) has the following structure:
.
├── .devcontainer
│   └── devcontainer.json (specifies behavior of the devcontainer, i.e. Docker)
├── .vscode
│   ├── c_cpp_properties.json (specifies behavior of the VS Code C++ language server for features like syntax highlighting)
│   ├── launch.json (specifies behavior of VS Code debugger)
│   └── tasks.json (automates some command line chores)
├── project source files (*.cpp, *.h, etc.)
├── test cases
└── Makefile
Usually, you need at least things in .vscode to enable debugger in VS Code for your projects. More details about these files can be found in the VS Code documentation: launch.json, Tasks, and c_cpp_properties.json.
In the context of this tutorial, we also need .devcontainer to tell VS Code how it should create a container for your project. This file is where you specify the image to use, and the command to run when you start the container, volume shared between the container and the host, and so on.
Since configuring the environment manually and setting the corresponding fields in these JSON files is difficult for many students, we unified the development environment by containerizing so that we can offer a reliable automation to setting up those files.